Saturday, December 24, 2011
Nutcracker 2011
We recently saw the Nutcracker at the Tulsa PAC with our friends, the Simons - our annual Christmas tradition going on four years now. This year, we were able to purchase tickets that allowed us to arrive an hour early to watch the dancers warming up before the show, then we got to go backstage and see the set close up. We had great seats for the performance and had so much fun - it's one of our favorite things to do at Christmas!
Labels:
Christmas,
nutcracker ballet
A Little Christmas Fun
* Our family's been elf-ed!
* Portable North Pole: In just a few easy steps, you can create a personalized video from Santa Claus for your children, friends, family members or colleagues by providing a few little details about the person.
Here's a video from Santa to my daughter, Mackenzie, and here's Abby's video. So fun ;-)
Here's a video from Santa to my daughter, Mackenzie, and here's Abby's video. So fun ;-)
Labels:
Christmas
Wednesday, December 21, 2011
"Shake Heaven" - Christmas Remix
For my girls - because they love this song ;-) ...
Labels:
Beckah Shae,
Christmas
Monday, December 19, 2011
Harriet Tubman Links and Videos
For my daughter, Mackenzie, who is writing a research paper on Harriet Tubman - wanted to have all the resources in one safe place ;-)
Harriet Tubman (Background & activities on brainpop.com)
Harriet Tubman (Enchantedlearning.com)
Harriet Tubman (GardenofPraise.com)
Harriet Tubman (KidsKonnect.com)
Harriet Tubman and the Underground Railroad (Timelines, quizzes, character sketches, poems & crossword puzzles)
Harriet Tubman: Civil War Spy (Natl. Geographic Kids)
Harriet Tubman (pppst.com)
Harriet Tubman (Scholastic.com)
Harriet Tubman (Wikipedia.com)
LINKS:
Harriet Tubman (Background & activities on brainpop.com)
Harriet Tubman (Enchantedlearning.com)
Harriet Tubman (GardenofPraise.com)
Harriet Tubman (KidsKonnect.com)
Harriet Tubman and the Underground Railroad (Timelines, quizzes, character sketches, poems & crossword puzzles)
Harriet Tubman: Civil War Spy (Natl. Geographic Kids)
Harriet Tubman (pppst.com)
Harriet Tubman (Scholastic.com)
Harriet Tubman (Wikipedia.com)
VIDEOS:
Labels:
Harriet Tubman,
homeschooling,
research
Sunday, December 18, 2011
Thursday, December 15, 2011
Ugly Christmas Sweater Party Pics
Our homeschool co-op recently had a Christmas Party for the parents, which was great fun because we rarely get together as couples. And what made it even more fun was that we all had to wear ugly Christmas sweaters to attend.
I couldn't find sweaters quite ugly enough for Steve and I to wear so the girls helped me make ours.
Here's some videos that gave us inspiration for crafting our outfits...
With supplies from Dollar Tree and shirts from Goodwill, we went straight to work! (And I'm proud to say that we spent no more than about $7 p/shirt!)
Steve's jacket before...
And after...
Isn't it a beaut?!?! We actually liked the jacket so we just pinned on all the decorations so he could wear it again later.
My "beautiful" vest, on the other hand, needed a few more touches. Just a little too plain...
With glue gun in hand, embellishments were added. And here's the final product...
I think the large sparkly butterfly is such a nice touch and makes it over-the-top beautiful - I mean ugly ;-)
Here we are sporting our new finds. You know you want one ;-)
Our girls went to Steve's sister's house during the party. It was the night of the OU/OSU bedlam game so everyone dressed in support of their favorite team. Go pokes!
Here are the terrific hosts of the party, Nicole and Rick. Don't you just love his added chest hair. It made us want to gag, yet we couldn't look away! ;-)
Here's pics of our fun night. As usual, the ladies were busy gabbing while the guys watched the game.
(Special thanks to Cheri for the pics!)
It was a super fun party and we hope to make this a new annual tradition ;-)
I couldn't find sweaters quite ugly enough for Steve and I to wear so the girls helped me make ours.
Here's some videos that gave us inspiration for crafting our outfits...
Steve's jacket before...
And after...
Isn't it a beaut?!?! We actually liked the jacket so we just pinned on all the decorations so he could wear it again later.
My "beautiful" vest, on the other hand, needed a few more touches. Just a little too plain...
With glue gun in hand, embellishments were added. And here's the final product...
I think the large sparkly butterfly is such a nice touch and makes it over-the-top beautiful - I mean ugly ;-)
Here we are sporting our new finds. You know you want one ;-)
Our girls went to Steve's sister's house during the party. It was the night of the OU/OSU bedlam game so everyone dressed in support of their favorite team. Go pokes!
Here are the terrific hosts of the party, Nicole and Rick. Don't you just love his added chest hair. It made us want to gag, yet we couldn't look away! ;-)
Here's pics of our fun night. As usual, the ladies were busy gabbing while the guys watched the game.
(Special thanks to Cheri for the pics!)
It was a super fun party and we hope to make this a new annual tradition ;-)
Creative Ways To Display Christmas Cards
I recently made a new Christmas card display holder and thought I'd share how I made it. It's super easy!
Materials:
Canvas
Scrapbook paper
Scissors
Acrylic Paint
Foam Paint Brush
Ribbon
Stapler
Instructions:
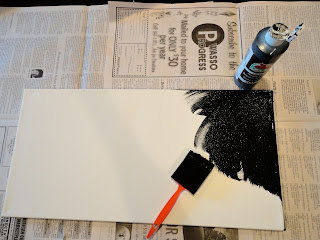
1. I chose a long, rectangular canvas that I thought would fit well in the space where I wanted to hang it. Then I base-coated it in black acrylic paint...
2. I found this great Christmas Subway Art Print on Tatertots and Jello. In fact, they have a ton of fun and cute printables on their posting. I printed it off on cardstock in a size that fit well on my canvas. I then glued it to bright yellow scrapbook paper, creating a small border and bringing out the yellow in the star on the print. Then I Mod Podged it to the center of the canvas...
3. I did a google search for "Christmas tree outlines" and found this one that was simple and easy to cut out. This time I printed it twice on the back of scrapbook paper, cut out both trees, then "aged" them by dry-brushing black paint to the outside edge. I thought they didn't quite stand out enough on the black canvas, so I glued them to the yellow scrapbook paper then cut around the edge, leaving a slight border. Then I Mod Podged both trees on either side of the Christmas Tree Subway Art Print on the canvas.
4. Next, I wanted to dress up clothespins that would hold the Christmas cards so I simply traced around them on scrapbook paper, cut them out, then Mod Podged the paper to the clothespins...
5. The last step was to attach the ribbon. I love this wide, shimmering ribbon I found for half off at Hobby Lobby. I cut three long strips about five feet each and stapled them to the backside bottom of the canvas, making sure they were equally spaced. Then I took a shorter strip of ribbon, about 1 foot long, and stapled it to the top back side of the canvas. This created a place to hang the ribbon on a nail, Command hook, or wreath holder...
And here's the final product...
I not only use it to display cards but also my favorite Christmas photos of my girls from years past. It makes me smile ;-)
Here are some links with other creative ways to display Christmas cards...
3 Easy Ways to Display Holiday Cards (Kaboose.com)
4 Ways to Display Christmas Holiday Cards (myLifetime.com)
Creative Ways to Display Christmas Cards (CreativeHomeStyle.com)
Displaying Christmas Cards (About.com)
Displaying Holiday Cards (HowStuffWorks.com)
Tuesday, December 13, 2011
Monday, December 12, 2011
A Little Christmas Crafting
The girls and I have been having a lot of fun making gifts and decorations for Christmas this year!
Here's a craft that Abby made. She took Mod Podge and painted it all over a candle, then she rolled it in Epson Salt. The salt gives it a sparkly "snow" appearance then she topped it off with a bow. I think it turned out great!
Mackenzie has been crocheting away making doll clothes, scarves, and blankets. Her mad skills amaze me...
And I made this Christmas banner to replace the Thanksgiving one I made last month. I'm so proud of myself for completing this project BEFORE Christmas arrived. Woo hoo! ;-)
Here's a little tutorial in case you'd like to try it out.
Supplies needed:
Scrapbook paper
Mod Podge
Cardboard
Scissors
Ribbon
Ornaments
Clothes Pins
1. Decide what you want your banner to say. I chose "Peace on Earth" but other options might include...
* Joy to the World
* O Holy Night
* Let It Snow
* Silent Night
Typically a short phrase or Christmas song title works best.
2. I printed out my phrase on shimmery, gold scrapbook paper - 2 letters p/page then I carefully cut them out.
3. I cut my cardboard pieces & scrapbook papers to be about 11" x 6". Then I Mod Podged a thin layer of glue around the edge of the cardboard then pressed it onto the back of the scrapbook paper, making sure it was flat and smooth.
4. After it was dry, I Mod Podged the letters onto the scrapbook paper boards.
5. Next, I traced around clothes pins on scrapbook paper, cut those out, then Mod Podged the paper onto the clothes pins - just dressed them up a bit ;-)
5. The I took a length of jute, maybe about 7 feet long, and tied a small loop at one end. I decided I wanted to hang the banner across the windows in my living room so I put Command hooks in place then put the beginning loop on the left hook. I stretched out the jute to the other side, made a loop, then hung that to the other Command hook. Working from the middle out, I hung the letters on the jute with the clips. It took a bit to figure out the spacing but I managed ;-) I also tied ornaments where the spaces fell in my phrase. After standing back and looking at it, I thought it needed a little more decoration, so I added ribbon knots on the end loops and on the clothes pins.
This was a fun and easy craft to make. Now I may have to keep making banners for each holiday! My poor husband says, "Stop the madness already!"
Here's a craft that Abby made. She took Mod Podge and painted it all over a candle, then she rolled it in Epson Salt. The salt gives it a sparkly "snow" appearance then she topped it off with a bow. I think it turned out great!
And I made this Christmas banner to replace the Thanksgiving one I made last month. I'm so proud of myself for completing this project BEFORE Christmas arrived. Woo hoo! ;-)
Here's a little tutorial in case you'd like to try it out.
Supplies needed:
Scrapbook paper
Mod Podge
Cardboard
Scissors
Ribbon
Ornaments
Clothes Pins
1. Decide what you want your banner to say. I chose "Peace on Earth" but other options might include...
* Joy to the World
* O Holy Night
* Let It Snow
* Silent Night
Typically a short phrase or Christmas song title works best.
2. I printed out my phrase on shimmery, gold scrapbook paper - 2 letters p/page then I carefully cut them out.
3. I cut my cardboard pieces & scrapbook papers to be about 11" x 6". Then I Mod Podged a thin layer of glue around the edge of the cardboard then pressed it onto the back of the scrapbook paper, making sure it was flat and smooth.
4. After it was dry, I Mod Podged the letters onto the scrapbook paper boards.
5. Next, I traced around clothes pins on scrapbook paper, cut those out, then Mod Podged the paper onto the clothes pins - just dressed them up a bit ;-)
5. The I took a length of jute, maybe about 7 feet long, and tied a small loop at one end. I decided I wanted to hang the banner across the windows in my living room so I put Command hooks in place then put the beginning loop on the left hook. I stretched out the jute to the other side, made a loop, then hung that to the other Command hook. Working from the middle out, I hung the letters on the jute with the clips. It took a bit to figure out the spacing but I managed ;-) I also tied ornaments where the spaces fell in my phrase. After standing back and looking at it, I thought it needed a little more decoration, so I added ribbon knots on the end loops and on the clothes pins.
This was a fun and easy craft to make. Now I may have to keep making banners for each holiday! My poor husband says, "Stop the madness already!"
Subscribe to:
Posts (Atom)


